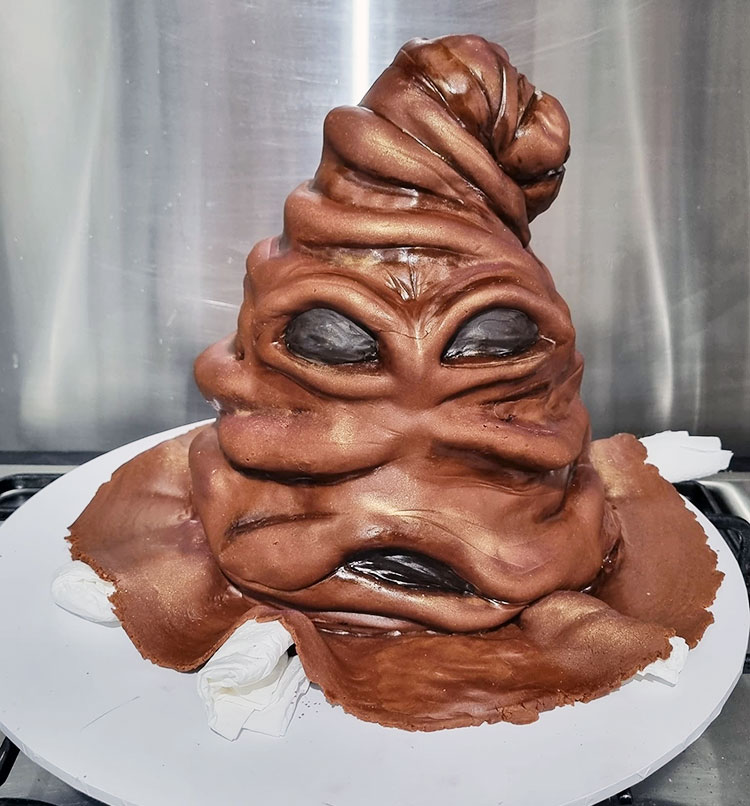
Fans of Harry Potter will recognise this cake instantly! What’s not to love about bringing the sorting hat to life…in cake form of course. Which house would you be in? Georgia has done a wonderful job putting together this amazing creation and shares some tips and tricks along the way to help you throw together your own Harry Potter inspired cake (ps: hoping I’m in Gryffindor).
Disclaimer: This article about Harry Potter sorting hat cake contains an affiliate link that will have no added costs for you if you click through it. That being said, I would never recommend you something for the small commission I will be getting from it. I am recommending you items I adore and love. Hope you like them too!
What you need
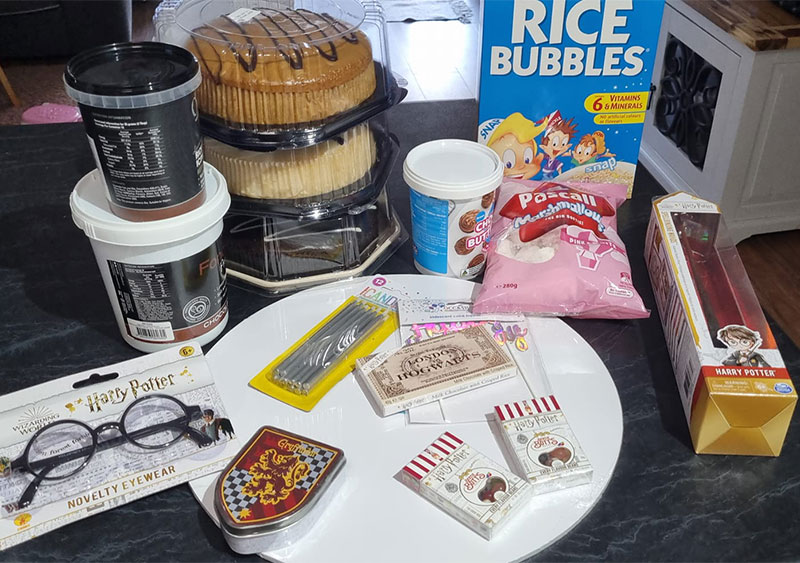
First thing’s first, it’s time to stock up on a few ingredients ready to build this masterpiece:
- Rice bubbles
- Marshmallow
- 3 x Coles mudcakes (yes, no cooking!)
- Brown fondant
- Brown food colouring
- Buttercream
- Plum luster dust
Harry Potter Sorting Hat Cake Decorations
Of course, you need some essential Harry Potter decorations as well to help bring the sorting hat cake to life.- The wand, glasses and chocolate ticket are from Big W.
- Georgia found the jelly beans in a lolly shop in Victoria, but they also sell them in Big W.
Method
Let’s get down to business and start creating this incredible cake.- Take off all the icing on the three Coles mudcakes. Layer them on top of each other on a cake board with some buttercream in the middle. Georgia used three different flavours: chocolate, caramel and vanilla, but the choice is yours!
- Once all the cakes are stacked, it’s time to pull out the knife and get carving. Remember: the top is going to be made from rice krispie treats. The aim is to create a lose cone shape, without the top!
- Mix together rice bubbles and marshmallows to create rice krispies. Mould this into shape to create the top of the hat, bending over at the peak.
- Cover with buttercream and allow it to set.
- Now’s the time to get creative with fondant! Mould into rolls, which can be used to create the wrinkles in the hat. The great part is, these rolls can go anywhere you like! If you want some inspiration, check out a video tutorial on YouTube. Also use the fondant to create the outline for the eyes.
- Cover with another layer of buttercream and allow it to set.
- Cover the entire cake in brown fondant, leaving plenty of overhang on the bottom to create the rim of the hat. Cut out the rim, and prop up in three places with paper towel. Allow the fondant to dry, then remove the towel.
- Use brown food dye to paint shadows over the cake, with a plum luster dust as a highlight (adding a nice gold touch).

